Friday, April 1, 2011

3 Tips to Improve Soft Skills


Like anything else, soft skills can be learned. The importance of soft skills training cannot be stressed enough. The interpersonal skills you gain throughout life will not only equip you to excel in your professional life, but also in your personal life. Here are three simple ways to improve your soft skills:

Take communication skills coursesSoft skills training courses are mixing technology with areas such as effective written/verbal communication, teamwork, cultural understanding, and psychology. For example, there are speech classes, writing classes to boost your communication skills. Look for conflict resolution or “leadership skill” courses either online or at your local community college.

Seek mentors—Mentors is another form of teamwork training. Approach potential mentors with the specific skills set you wish to learn from in a friendly, professional way. Ask them which effective soft skills got them ahead in their careers. Compliment that person with a specific example in which you've seen him or her practice that skill.

Volunteer—Brush up on many essential skills through volunteering (i.e. teamwork, decision-making strategies, management, communication skills, reporting, writing, public speaking etc.) Not only are you communication skills training, but a high profile volunteer work on your resume provides you with an opportunity to explain the knowledge and skills acquired to your potential employer.

Tips for Building Successful Teams

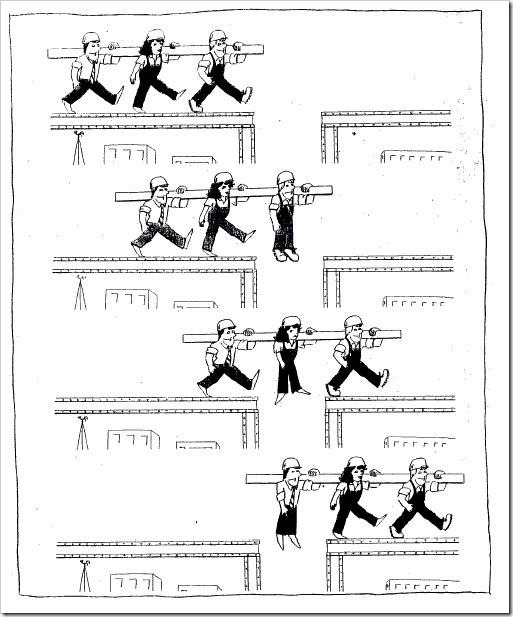
Here are some great tips for working smoothly in teams (and getting past that pesky Storming phase!):
  • Assign roles and tasks to make sure each team member has something to do and that everyone participates in achieving the overall goal.
  • Generate a plan: Where are you today? Where do you want to be tomorrow? How are you going to get there?
  • Keep the team small: Small teams have better communication, and it's easier to make sure everyone stays on task.
  • Know the team norms: Teams will establish acceptable and unacceptable behavior. It's important for every team member to be aware of these guides and know the consequences for unacceptable behavior.
  • Emphasize common characteristics and interests to foster team unity.
  • Praise and compliment your team members for jobs well done.
  • And remember, make sure to have FUN!

5 Most in Demand Interpersonal Skills


The importance of soft skills training should not be overlooked because to move ahead in your career, you need more than technical qualifications. Yes, technical skills may get you an interview, but it’s really your soft skills, also known as interpersonal skills, that land you the job. It’s also your soft skills that help you keep your job too. Here are six in demand “soft skill training” asked next to the demands of technical qualifications:


Communication Skills—Interviewers prefer job applicants with communication skills training. This does not mean they are looking for applicants who speaks or writes well specifically, but someone who can express themselves. For example, someone who can write a coherent memo, the ability to persuade others with a presentation, or just the ability to calmly explain to team members what he/she needs and wants.


Teamwork—Effective productivity in an organization depends on the constructive teamwork and collaboration of its workers. Teamwork training is a crucial desired soft skill that interviewers are looking for in candidates, someone who can play and work well with others. Companies look for someone who can take charge when the occasion calls for it, be a good follower, monitor the progress of a project, meet deadlines, work well with others across the company to achieve a common goal etc.


Problem solving—Have you ever wondered why most interviewers ask you the question, “How did you turn a negative situation into a positive one?” This question is asked specifically to gauge the success of your assertiveness training. Be prepared for this question in any interview with several examples of what you did, how you approached a situation, how you involved others, and what the outcome was.


Critical observation— No interpersonal skills training would be complete without learning about the importance of critical observation. It’s not enough to just collect data and manipulate it, you must also have the ability to digest, analyze, and interpret the information. You should be asking yourself when viewing important facts, how does the data affect the company as a whole?


Conflict resolution—Ability to resolve a conflict should also be included in your soft skill training. Your ability to persuade, to negotiate, and resolve a conflict is momentous for your career advancement. Be ready to show your conflict resolution skills and when the time calls for it, to negotiate win-win solutions to serve the best interest of the company and individuals involved.

Thursday, March 31, 2011

How to configure DHCP split-scope using wizard


Split-scope configuration (Widely known as 80/20 Configurations) is typically considered as high-availability deployment scenario for the DHCP Server. It involves configuring scopes with the same subnet address and subnet mask and configuration on two distinct DHCP Servers. The two scopes have complementary exclusion ranges and therefore will not serve the same address to different clients.

The ratio of address ranges across the servers is denoted as Primary Server to lease 80 percent of the addresses in the scope and the secondary server to lease out 20 percent of the addresses in the scope. Splitting a scope between servers in this way, which is commonly referred to as the "80/20 rule," often relies on the proximity of the DHCP servers to the clients it serves. To avoid address range exhaustion on the secondary (20% address range) server, it can be configured to send out the DHCP OFFER with a small delay as well.

Configuration Steps:

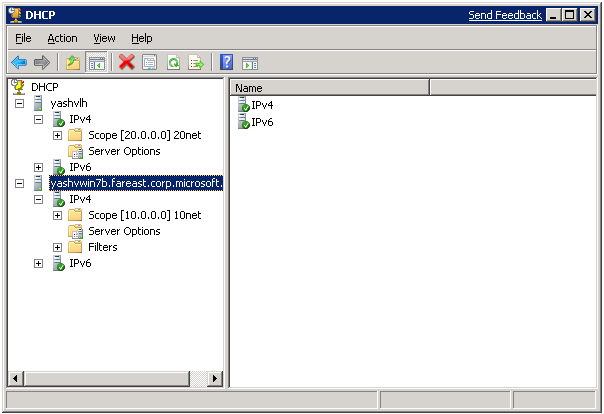
Fig1- Launch DHCP server

Right click on the scope that is to be split and press the advanced menu item and split scope menu item.


Fig 2: Launch the Split scope screen
Press the next button on this screen to proceed


Fig 3: Initialization screen
Add the secondary server in the edit box, if secondary server does not exist an error is displayed. It is only after having provided valid secondary DHCP Server one can click Next. Press next button to proceed.


Fig 4: Add Secondary DHCP server screen


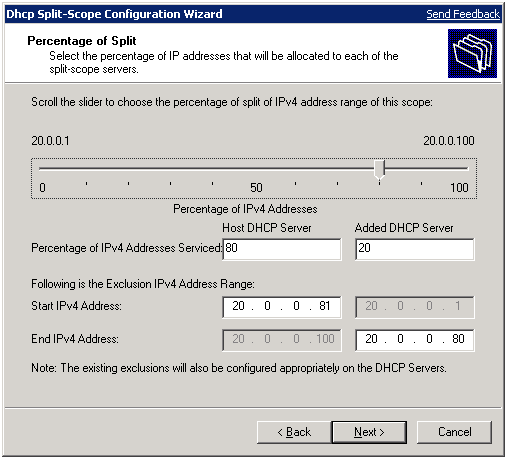
Adjust the split using the slider control; all other values are automatically adjusted OR the split can be configured with percentage field or IP Address range of the exclusion. Press next button to proceed.


Fig 5: Split scope configuration screen


Specify the delay on the secondary server, press next button to proceed.


Fig 6: Split scope delay configuration screen
This screen shows the selected configuration before you could proceed for split. Press next button after checking your configuration.


Fig 7: Configuration summary screen
Show the result of the split.


Fig 8: Summary results screen
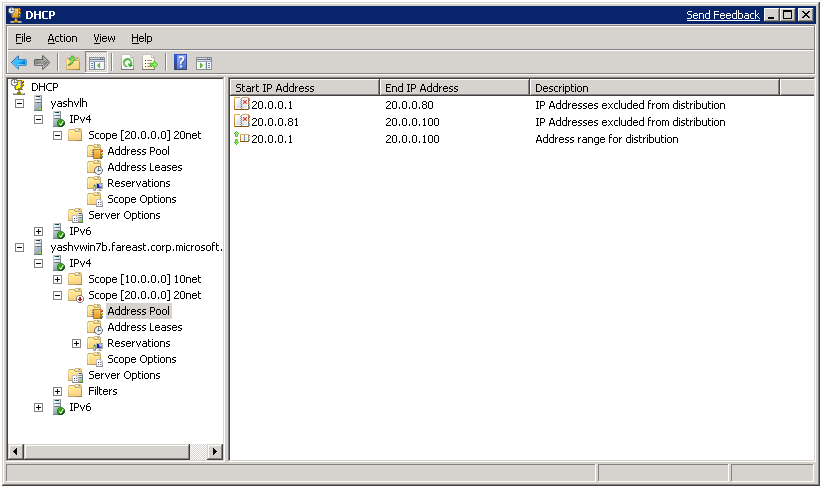
This page shows the scope getting configured on the secondary server and the exclusion range set on the secondary server


Fig 9: DHCP server showing split scope
Hope this helps you in configuring the Split-Scope and manage the address effectively. 

Wednesday, March 30, 2011

Windows Event log limitations


Not sure how many people modify the size of the Windows Event Logs but it is something that I like to do simply because the default sizes of most them is just not enough.  For example you may remember the default for your System and Application log files was a measly 512kb.  That logged all of about a day of a really busy application server. 
The problem with Server 2003 was the recommended maximum size for a log file was only around 300mb and the maximum total size for all Event Log files was around 400mb.  You do the math and you can see that realistically you aren’t going be able to realize the benefits of having larger Event Log file sizes.

This has to do with Windows storing the logs in memory.  As you can tell a 32bit system would run into some serious memory issues if you wanted to expand the size of several of these.  Thankfully in Server 2008 this has changed.  Microsoft has increased the recommended maximum size of a log file up to 4gb and all of them up to 16gb.  Of course you will want to make sure you’re running the x64 flavor of Server 2008 to really see this advantage.

Take a look at the following knowledgebase from Microsoft for more info.

Is my Active Directory Backed Up?


There are a ton of methods to backup Active Directory.  I’m not going to get into each method with this post.  What I am going to do is share another little command that can be run to check to see if your Active Directory was backed up and when.
Before I discuss that command one point I would like to make is to be very careful about who you let backup and restore your Active Directory DB.  From a security standpoint this could be a major violation of your company’s security policy.  Think it about for a minute.  Let’s say I work in a support group in your company that provides backup and restore services for all systems, including Domain Controllers.  I could take that backup of Active Directory and restore it to a private system that I have.  Now I could use a number of tools to help try to crack into it.  Sure it may take a bit of time but I've got plenty of time.
If you have a group that is responsible for backups and restores on Domain Controllers then I believe you need to put some really good policies and guidelines in place to protect your most important asset…Active Directory.  I actually don’t like anyone backing up Active Directory that isn’t an Administrator and I always select the option that only and Administrator can restore the backup.  I understand that a rouge admin could do harm but at least there was some mitigation put in place.
Now, finally to the point.  Is my Active Directory backed up?  For this one we are going to run another Repadmin command.
repadmin /showbackup
This will show you when your last backup of Active Directory ran.  You don’t need to run it against a specific DC because Active Directory doesn’t care.  If you have child domains in your environment and want to run this against them all just put a  * at the end of the command and it will check all the domains.
Now go out there and make sure your Active Directory is backed up!!!

Find and Disable Stale User Accounts


Stale user accounts can be a big problem…even more so when they are not disabled.  I’m a firm believer that if you have an account that is not being used it should be disabled.  However depending on the size of your Active Directory that can be a daunting challenge.  Below you will find a snippet of code that will identify where user accounts are not being used for 10 weeks and then it has the ability to disable them. 
dsquery user -inactive 10 -limit 0
The 10 value is for the number of weeks an account has been inactive.  If you think you are going to have a lot of these then you may want to change your limit from 0 to something like 50 or so.
Now if you would like to disable them as well you simply add on another portion of code.  For safety reasons I prefer to run the code above first to see who is inactive and then once I’ve validated those accounts can be inactive I run the following code to disable them.
dsquery user -inactive 10 -limit 0 | dsmod user -disabled yes
Obviously the account needs to have the appropriate permissions for dsmod to work so watch out for that.  Good luck and happy hunting!

Tuesday, March 29, 2011

10 things you should know about USB 2.0 and 3.0


USB 3.0 has been highly anticipated — and now, it’s finally here. Sort of. Find out about its availability, specifications, benefits, and limitations.
USB 3.0 is here! After long delays and much touted promotion of the new specification, USB 3.0 is now finally available or soon will be on some new ASUS and Gigabyte motherboards. ASUS has also announced an add-in PCIe  x4 card with USB 3.0 support, though it is compatible only with its P55 series of motherboards after a BIOS upgrade. Dane-Elec has announced a family of external SuperSpeed SSD drives and add-in card, but you will have to pay a hefty premium for the extra performance.

There is some bad news, though: Intel has announced that it will not include USB 3.0 in its chipsets until 2011. AMD may not support USB 3.0 until 2011 either. That means that USB 3.0 is not likely to go mainstream until then.
Current versions of Windows do not support USB 3.0, but support is expected for Windows Vista and Windows 7 at a later date via an update or service pack. The Linux kernel supports USB 3.0 as of version 2.6.31.
Now that USB has finally arrived, albeit barely, this is a good time to compare the previous USB specifications with USB 3.0.
Note: I have taken great care to verify the accuracy of this information, but USB is complex. If you find an error in the documentation or have additional information, please post it in the comment. The examples in this document all use Windows 7.

1: USB release dates

USB (universal serial bus) was developed as an alternative to serial and parallel data transfer protocols. USB 1.0 was introduced in January 1996. As you can see in Table A, it has been a long time since the USB 2.0 specification was released.

Table A 


2: Changes in USB 3.0

USB 3.0 is one of the most anticipated changes to the PC in years. Here is a summary of the major changes:
  • SuperSpeed — New higher signaling rate of 5Gbps (625MB/sec)
  • Dual-bus architecture — Low-Speed, Full-Speed, and High-Speed bus plus SuperSpeed bus
  • Asynchronous instead of polled traffic flow
  • Dual-simplex simultaneous bi-directional data flow for SuperSpeed instead of half-duplex unidirectional data flow
  • Support for streaming
  • Fast Sync –N-Go technology
  • Support for higher power
  • Better power management

3: The Low-Speed, Full-Speed, High-Speed and SuperSpeed confusion

There are four distinct data rates - not to be confused with the four USB specifications. Each new major USB specification introduced a new data rate. Table B shows USB data rate types supported by the four USB specifications. Each new USB specification has been backward compatible.

Table B 


Table C shows maximum data rates for the four data rate types.

Table C


USB 2.0 does not always mean High-Speed. This is usually, but not always, the case. A device labeled USB 2.0 can operate at Full-Speed instead of High-Speed.
Will this confusing labeling exist for USB 3.0? The USB 3.0 specification supports the three legacy speeds in addition to SuperSpeed. This is accomplished by referencing, not replacing, the USB 2.0 specification. Low-Speed, Full-Speed, and High-Speed devices are USB 2.0 compliant but not USB 3.0 compliant, so a USB High-Speed device should not be labeled as a USB 3.0 device. The USB Implementers Forum (USB-IF) has developed logos for each of the four data rates. Look for these logos when buying a USB device.
You can determine whether your USB 2.0 device is a High-Speed device in the Windows Device Manager (Figure D), although it is not a straightforward exercise. You will probably have to try more than one USB Root Hub before you find the device you are looking for.
Figure D
Open the Device Manager and expand the Universal Serial Bus controllers item. Open the Properties window for a USB Root Hub. Tip: Start at the bottom USB Root Hub.
Next, click the Power tab (Figure E). If the device is attached to this hub it will appear in the Attached Devices section. In this example, I have attached a flash drive and it is displayed as a USB Mass Storage Device. Note that this Root Hub has six ports available — one of them used by the USB Mass Storage Device.
Figure E

Finally, click the Advanced tab to see the USB speed (Figure F). On my system, the top six USB Root Hubs operate at Low-Speed and Full-Speed and the bottom two each operate at High-Speed.

Figure F

4: Actual data throughput

Actual data throughput is usually much less than the maximum advertised USB specification and is a function of many variables, including overhead. Actual throughput in practice is typically up to 3540MB/sec for USB 2.0 and may exceed 400MB/sec for USB 3.0. NEC recently demonstrated its new USB 3.0 controller transferring 500MB in 4.4 seconds or “only” 113.6MB/sec. Symwave and MCCI claim to have demonstrated over 270MB/sec data throughput at the Intel Developer Forum in September 2009.
Bottom line: Don’t expect actual SuperSpeed data rates approaching 400MB/sec anytime soon.
I have a USB flash drive that can read at 26MB/sec and write at 6.6MB/sec and is typical of flash drives available as of late 2009. These data rates are within the actual High-Speed data rate. ButFaster USB 3.0 flash drives are on the way that can take advantage of the SuperSpeed data rate.
Most hard disk drives can transfer data faster than 40MB/sec. USB 3.0 will be welcomed by those who like to back up data to an external hard drive or SSD drive or who have any USB device that transfers large amounts of data.

5: Cabling and maximum cable length

During my days at Hughes Aircraft Company, I was always looking for ways to save money. I suggested that my supervisor, who sat in the next cube, share a laser printer with me. But printing over the long parallel cable caused characters to be intermittently printed as the gibberish that is so familiar when data loss or corruption occurs. USB cables have a similar constraint. But unlike my parallel cable problem, there is a solution.
Table G shows the maximum cable and total lengths.

Table G

*The USB 3.0 spec does not detail a maximum cable length, but 3.0 meters or 9.8 feet has been recommended.
A total of six cables can be strung together using five hubs to achieve the maximum total length. In practice, the cable to the USB device counts as one of the six cables, reducing the maximum total length.
If the USB 2.0 five-meter limit is not long enough for your needs, you can purchase one or more USB hubs or special cables. There are two types of hubs: powered and unpowered. Higher power draw devices may require a powered hub.
Longer total lengths can be realized using repeater extension cables and CAT5 extenders for USB 1.0, 1.1, and 2.0. There is also a special class of USB 3.0 cables that contain circuitry to achieve a length of six meters (19.7 ft). The USB-IF Web site recommends a USB bridge to achieve lengths greater than 30 meters.
The USB 2.0 specification for a Full-Speed/High-Speed cable calls for four wires, two for data and two for power, and a braided outer shield.
The USB 3.0 specification calls for a total of 10 wires plus a braided outer shield. Two wires are used for power. A single unshielded twisted pair (UTP) is used for High-Speed and lower data transfer and allows for backward compatibility.
Two shielded differential pairs (SDPs) have been added. Each SDP contains three wires, two for signal transmission and one drain wire. The two SDPs are used for transferring SuperSpeed data allowing for simultaneous bi-directional data flow.
See the Author’s Notes section at the end of the article for a reference to a USB 3.0 cable cross-section diagram.

6: Power

One of the most significant innovations in USB over serial and parallel protocols is the addition of power to the specification. Plug in a USB device and it can be powered from the host computer.
To find the power requirements for USB devices open the Device Manager, expand the Universal Serial Bus controllers item, Right-click on Generic USB Hub as in this example or USB Root Hub(Figure B), select Properties and click the Power tab, as shown in Figure H

Figure H

More power has been added in the USB 3.0 specification for power hungry devices. Table I, shows the maximum amperage per port in milliamps.

Table I

There are four basic power states to accommodate a variety of devices and device states. For information about USB hubs and power, read Greg Shultz’s article Understand and exploit USB topology in Windows XP.
Note:  The USB 3.0 specification details more power states, including idle and sleep.

7: Limitations

We’ve already discussed some of the USB limitations:
  • Maximum data rates
  • Actual data throughput
  • Cable length and total length
  • Power
There are several other limitations that you should know about.
Though you will likely never find it an issue, there is a 127 device limitation per controller.
Each USB 2.0 Enhanced Host Controller Interface (EHCI) host controller has a 60MB/sec total bandwidth limitation, and the bandwidth is shared by all attached High-Speed USB devices. If, for example, two High-Speed devices like a digital video camera and an external hard drive are in use at the same time, the last High-Speed device attached may operate at a lower data rate or a USB Controller Bandwidth Exceeded error may occur. If you have two EHCI host controllers on your system, you may be able to resolve the bandwidth error by moving one of the High-Speed devices to another USB port. Wikipedia has a list of I/O Controller Hubs with two or more EHCI host controllers.
Want to know how much bandwidth has been allocated for each USB device in Windows? According to this MSDN articleyou can check Device Manager, if you use Vista or later:
“Starting with Windows Vista, users can see how much bandwidth a USB controller has allocated by checking the controller’s properties in the Device Manager. Select the controller’s properties then look under the Advanced tab. This reading does not indicate how much bandwidth USB hubs have allocated for transaction translation.
“The Device Manager feature that reports the bandwidth usage of a USB controller does not work properly in Windows XP.”
Figure J shows that three USB devices have been allocated 4% of the bandwidth available for this Universal Host Controller. The Fujifilm FinePix S700 digital camera is a USB Full-Speed device and is therefore listed under one of the Universal Host Controllers and not one of the Enhanced Host Controllers. The USB specification defines four data transfer types:  ControlInterrupt,Isochronous, and Bulk. The 10% System reserved value shown here is used for Control and Bulk data transfers and cannot be changed.

Figure J

During system boot-up and when a USB device is plugged in, a process called enumerationoccurs. The device is recognized, its speed is identified, and a unique address is assigned. For devices using the Interrupt or Isochronous data transfer types, a specific amount of the remaining available bandwidth is requested, thus guaranteeing that the bandwidth will be available. If the bandwidth is available, it’s allocated, and the device description and reserved bandwidth will be listed on the Advanced tab.
Note: Don’t bother looking for the bandwidth used by a Mass Storage device like a flash drive. Thisclass of USB device typically uses the Bulk data transfer type and is not listed on the Advanced tab.
In addition to any of the System Reserved bandwidth that may be available, devices using the Bulk data transfer mode may use the remaining non-reserved bandwidth. The Bandwidth Used column heading is misleading. The bandwidth is allocated/reserved but may not actually be used.
As you can see in Figure K, ICH9R Southbridge supports six Universal Host Controller Interface (UHCI) host controllers and two Enhanced Host Controller Interface (EHCI) host controllers. The number of UHCI and EHCI host controllers may be different on your system. The ICH9R supports a total of 12 USB ports. The six Universal Host Controllers operate at Low-Speed and Full-Speed and each shares its bandwidth with two USB ports. The two USB2 Enhanced Host Controllers operate at High-Speed and each shares its bandwidth with six USB ports. The Advanced tab shows that 20% of the bandwidth is reserved by each Enhanced Host Controller for Control and Bulk data transfers.

Figure K

Note:  There is another host controller type, not shown, called USB Open Host Controller Interface (OHCI) that supports Low-Speed and Full-Speed devices. The name of the new Intel SuperSpeed host controller specification is Extensible Host Controller Interface (xHCI).

8: Connector and receptacle types

There are a number of USB 3.0 connector and receptacle types:
  • Standard-A connector and receptacle
  • Standard-B connector and receptacle
  • Powered-B connector and receptacle (new in USB 3.0)
  • Micro-AB receptacle
  • Micro-A connector
  • Micro-B connector and receptacle
The matrix in Table L shows the types of USB 2.0 and USB 3.0 connectors that will work with USB 2.0 and USB 3.0 receptacles. Note that according to the USB 3.0 specification Table 5.1, the only USB 3.0 connector that will work in a USB 2.0 receptacle is the Standard-A connector.

Table L

A new multi-tiered system has been developed for the extra pins needed for USB 3.0. The Standard-A connector is slightly longer and the receptacle slightly deeper to accommodate the new design. Five pins have been added to the Standard-A connector and receptacle specifically for SuperSpeed transmit and receive data and ground.
The USB 3.0 specification recommends using a blue color scheme for USB 3.0 Standard-A connectors and receptacles to distinguish them from USB 2.0 Standard-A connectors and receptacles.
The USB 3.0 specification includes a new type of connector and receptacle called a USB 3.0 Powered-B Connector and USB 3.0 Powered-B Receptacle. They are identical to the USB 3.0 Standard-B Connector and receptacle, except that two pins have been added for power and ground. It is designed to provide power to a USB device without the need for any other power source. The USB 3.0 Powered-B Receptacle can accept both Standard-B and Powered-B connectors.
The Micro family of connectors and receptacles are defined for handheld devices. Unlike the Standard-A connectors with their elegant design, the Micro connectors and receptacles have a more complex design with two plugs and receptacles sitting side by side — one for USB 2.0 and the other for USB 3.0.
See the Author’s Notes section for references to diagrams for the USB 3.0 Standard-A Connector, the USB 3.0 Standard-B Connector, and the USB 3.0 Micro Connector Family.

9: Hot-swappable devices and data corruption

I can’t write an article about USB without bringing up the issue of data corruption. Removing any USB device capable of writing data can cause data corruption if done improperly. There are three ways to minimize the risk of data corruption:
  • Verify write-back caching is off
  • Pay attention to device LEDs
  • Safely remove/eject device
First, verify that write-back caching is turned off for the USB device. To verify write caching status, open Device Manager and right-click on the USB device. Select Properties from the drop-down list (Figure M). In this example, I am checking a SanDisk Cruzer flash drive.

Figure M

Next, click the Policies tab (Figure N). The Quick Removal (Default) option should be selected. If not, select it to reduce the risk of data corruption.

Figure N

Second, pay attention to device LEDs. Some USB devices will tell you when data is being transferred to or from the device with a flashing LED. Simply put, don’t remove the USB device when the LED is trying to tell you not to.
Third, safely remove/eject device. No doubt you already know how to safely remove a USB device but I am including it to be thorough. To safely remove a USB device in Windows 7, click the Taskbar Notification area Up-arrow and click on the USB icon (Figure O).

Figure O


Click the USB device you want to eject — Cruzer Micro, in this example (Figure P).
Figure P

The Safe To Remove Hardware notification balloon will appear when it is safe to remove your flash drive (Figure Q).

Figure Q

There is an alternate method for ejecting a USB device that you might not be familiar with. To safely remove a flash drive using Explorer, right-click on the logical drive assigned to the flash drive and select Eject from the drop-down list (Figure U). You can eject attached drives in Explorer, but be aware that more than one drive may need to be ejected.
Figure U

10: USB downsides

USB can cause problems that can be difficult to debug. For example, on one occasion I was unable to install XP until I disconnected the USB to parallel cable attached to my printer.
USB is so convenient and easy to use, it poses problems in the workplace. Flash drives are the biggest concern to IT managers. Flash drives are so small that they are easy to bring into the workplace in a pocket or purse. The flash drive is a conduit for sensitive or confidential data leaving the office or malware sneaking in.
In addition, people who are conscious of the risks of transferring viruses via a floppy, CD, or DVD don’t think twice about plugging in a flash drive and transferring files to/from home. Perhaps the best solution to this problem is education. Flash drives are banned in some government agencies and companies, though the effectiveness of that policy is questionable. Interestingly, the DOD ispartially lifting its flash drive ban.

The final word

USB has been such a huge success that a more than 10 times improvement in speed and an 80% increase in power is almost certainly guaranteed to be just as successful, right? Well, maybe not. Intel’s original conceptual designs for the USB 3.0 cable specified optical fiber cabling to carry the SuperSpeed data. Copper replaced fiber optics in the final USB 3.0 spec, but Intel continues to work on a variation of this design known as Light Peak. It may be available as early as 2010 in Apple products before Intel plans to support USB 3.0 in its chipsets.
Light Peak promises double the data rate of USB 3.0 now, with speeds possibly reaching 20 times the USB 3.0 speeds as the new technology matures. Perhaps more important in the short term, Light Peak cables may reach 100 meters (328 feet) in length and may be smaller in diameter and lighter.
Could Light Peak make its way to the Wintel platform? It certainly could, and its data transfer capability would leapfrog it past USB 3.0. So don’t bet just yet that USB 3.0 will be as successful as its predecessors. Regardless of what happens with Light Peak, USB SuperSpeed should satisfy USB device data rate requirements for many years to come.